Week 5
Objectives for today’s class:
- Introduce Reusing and Remixing with Design Thinking Activity
- Projectiles
- Simulation
- Checkpoint
- Creative Time
—————————————————————————————————–
Activity 1: Design Thinking Intro
Duration: 8 minutes
- Ask students, do you recall a time when you helped to finish some kind project that someone else started? Maybe helping your parents cook a meal, or helping a friend build an art project?
- Collaborating with someone else makes the project you are working on even better – two heads are better than one.
- Let students know that they will be playing a game where they get to build off of someone else’s work.
- Make sure every student has one piece of paper and a pencil
- Set a timer for 20 seconds – instruct them to start drawing a picture (it could be of anything they want)
- After the timer goes off, tell them to pass the paper to the student to their right. They should collect a paper from the student to their left
- Set the timer for another 20 seconds and allow them to continue working on whatever drawing they have
- After the timer goes off, tell students to switch papers again
- Continue this process until the drawings have been passed many times
- When done, allow students to volunteer to share their drawings with the class
- The game we just played allowed us to have many artists working on one drawing. This resulted in many very unique drawings that you might not have created if you were working on your own
- This process is similar to the design thinking principle of reusing and remixing
- Reusing and Remixing is a process in programming where people build upon other people’s code. This has become more popular through network technologies that provide access to a wide range of other people’s work to reuse and remix.
- For example:
- Direct copying of game features from other games by replicating code
- More indirect copying of features and ideas via observation or conversation with peers
Activity 2: Creating a Projectile – Hands On Simulation
Duration: 15 minutes
- Let students know to follow along closely as you work with them on a new simulation.
- We are going to create a game where the main character, Adam, is trying to dodge apples that are falling from the sky.
- Show students the outcome of the simulation before getting started and instructors should create the MakeCode Simulation Code before the start of class.
- Make the simulation interactive by adding your own style of calling students up to the board, helping piece together the code, asking questions that you think enhance any concepts students are stuck on, and reiterate any concepts that students need reinforcement on!
- Have them open up a new MakeCode Arcade file and name it ‘Falling Apples’
- First we need to create a player sprite that can move with keys.
- Find set mySprite to in Sprites. Drag it into the on start. Click on mySprite, select rename variable…, and change the name to Adam. Open the image editor for Adam, and select a person sprite from the gallery of preset images.
- Find move mySprite with buttons in Controller. Drag and drop it onto the on start. Change the variable name from mySprite to Adam.
- Now we want to position Adam at the bottom of the screen, and restrict his movement to only moving left and right on screen.
- Find set mySprite position to x() y() in Sprites. Drag and drop it onto the on start. Change the variable name from mySprite to Adam. Change the x coordinate position to 80, and the y coordinate position to 110.
- Click on the plus button on move Adam with buttons to reveal the vx and vy parameters. Change vy to 0.
- Find set mySprite stay in screen in Sprites. Change the variable name from mySprite to Adam.
- Now we will create the apple projectile that will fall from the sky.
- Projectiles are regular sprites that destroy themselves when they go off of the visible screen.
- Find set projectile to projectile from side in Sprites. Drag and drop it onto the on start. Click on projectile, select rename variable…, and change the name from projectile to Apple. Open the image editor for Apple, and select the apple sprite from the gallery of preset images. Change the vx value to 0.
- When we change the value of vx to 0, this means we are restricting the projectiles movement on the x axis. If our projectile cannot move at all on the x axis (left/right) then it can only move on the y axis(up/down). Therefore it will prevent our projectile from moving diagonally, and cause it to fall straight down.
- Now we have one apple projectile that falls from the sky. But what if we want many apples to fall from the sky? We can use a loop.
- Find on game update every 500ms in Game. Drag and drop it onto the canvas.
- This block creates our loop – after every 500 ms (which is half of a second), the code inside this block will execute again.
- Drag and drop the set Apple to projectile from side block that we created earlier inside on game update every 500ms.
- Find set mySprite x to 0 in Sprites. Drag and drop it inside on game update every 500ms. Change the variable name from mySprite to Apple. Find pick random 0 to 10 in Math. Drag and drop it over the 0 value in set Apple x to 0. Find screen width in Scene. Drag and drop it over the 10 value in pick random 0 to 10.
- This will cause the apple sprite to generate in a random place somewhere on the entire width of the top of our screen. From the place it was generated, it will fall straight down.
- We have our movable player sprite Adam, our apple projectile, and our loop that continuously generates more apples to fall from the top of our screen. Now we want to make something happen if Adam fails to dodge an apple.
- Find on sprite of kind Player overlaps with otherSprite of kind Player in Sprites. Drag and drop it onto the canvas. Change the Player variable of kind otherSprite to of kind Projectile. Find game over in Game. Drag and drop it inside on sprite of kind Player overlaps otherSprite of kind Projectile.
- This block creates a conditional, because the contents of the block only execute once the condition is met. In this case, the condition is when the Player sprite overlaps with a projectile sprite (when Adam touches an Apple). Only after this happens, the “Game Over” code will execute.
- Congratulations, your game is complete!
- So let’s revisit what we just made in our simulation. Please make sure not to skip this next part.
- A projectile is a sprite that generates from another sprite, that destroys itself when it goes off the visible screen. A projectile sprite has its own adjustable velocity properties.
- Depending on the game, a projectile can be dangerous, friendly, or even just a decoration that floats across the screen.
- Ask students why do we want projectiles in this game?
- Ask students how could projectiles be useful in other games? Can you name some examples?
- A loop is a segment of code that can be executed repeatedly.
- Ask students why are loops useful to us?
- Ask students how did use loops in this simulation?
- Ask students what would our simulation look like without the loop?
Activity 3: Meteor Game Checkpoint
Duration: 15 minutes
- This is a perfect time for students to test their knowledge of projectiles and loops by creating an example on their own!
- Show students the outcome of the checkpoint activity in MakeCode before having them start and answer any questions they may have. You should create the MakeCode Checkpoint activity on your own time ahead of class!
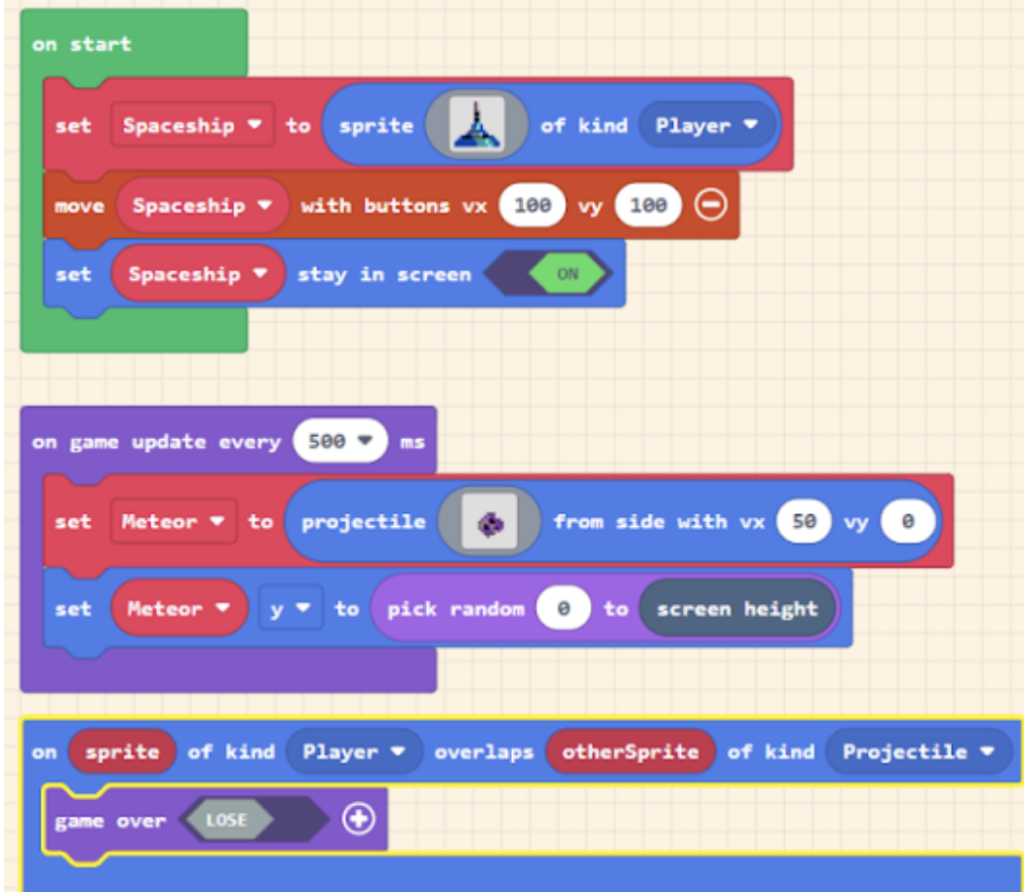
- Student Task:
- Create a new file and name it “Meteor Shower”
- 1 player sprite that is a spaceship that can move with keys
- The spaceship is set to stay on screen, but it can move up/down left/right
- There are meteor projectiles that move from the left side of the screen to the right side of the screen.
- A new meteor projectile is generated every 500 ms
- If the spaceship gets hit by a meteor, its game over!
Example Code:
Activity 4: Creative Time
Duration: Remainder of Class Time
- Once students are finished with the checkpoint activity and you review their work, give them time to pick their own themes, Sprites, and game objectives to design their own game. Encourage them to use the topic they learned in today’s class with projectiles and loops and find ways to incorporate it into their game.
- If students are stuck on idea help them brainstorm by asking them the following questions:
- What is the theme of your game?
- What is the game’s objective?
- What’s the main character sprite?
- Is there a projectile?
- How are you incorporating loops into your code?