Objective 1
Instructors should make sure to share class objectives for today before starting the class.
Objectives for today’s class: Students will understand the fundamentals of games and dissect a simple game. Then, they will dive into MakeCode Arcade and create a sample story using the editor.
The outline is for the instructor. Review it and make sure you understand the flow of the class.
Class Outline:
- Game Design 101
- What are games made up of?
- What is game design?
- Game analysis with MakeCode
- MakeCode Arcade Introduction
- Hands on simulation: Under the Sea
- Checkpoint Activity: My Story
—————————————————————————————————–
- Before students arrive make sure you have the class objective written on the board
- Once students arrive, start by taking attendance
- We will have an ice breaker as part of activity 1
- Before we start activity 1, since this is the first class, we need to set expectations
- Setting classroom expectations is an empowering activity to help build the community and culture of the Kodely classroom.
- Grab a piece of paper/on the board and create a web chart similar to the one below. Instructors can create a sample web chart ahead of class to practice:
- The center of the circle on the chart should be labeled something like, “Kodely Classroom Rules.”
- Then, show them how to add lines going from the center circle to another circle. These secondary circles will house what they feel are good rules for the art room. For example, “Respect others while they’re talking.”
- Ask students:
- How can we create a respectful classroom environment?

Activity 1: Design Thinking Intro
Duration: 15 minutes
- Before we get started, let’s do a little warm up ice breaker!
- Play Simon Says for 5 minutes.
- A leader (Simon) tells the players to do certain things (“touch your nose” or “hop on one leg”). But if the leader doesn’t first say “Simon says,” players must not do it or they’re out. Ask students to keep score (or count) of how many rounds they stayed in the game for!
- Have a student volunteer to be Simon and lead the instructor and the rest of the class.
- Once done playing Simon Says ask students:
- Did everyone follow the rules of the game?
- What’s the objective of a game like Simon Says?
- What was the point of keeping count of our scores in the game?
- Now, we’re going to play some games on MakeCode Arcade and understand what they’re even made up of. We’re going to cover:
- Defining a Theme
- Visually – Where is the game taking place? Who are the characters? What is the objective?
- Game Assets
- Engage the who, what, where?
- Incorporating Game Mechanics
- What category of game do you want to create? Share with students examples of the different game categories below:
- Maze Games
- Collecting Games
- Q&A Games
- Dodging Games
- What category of game do you want to create? Share with students examples of the different game categories below:
- Defining the Game’s Objective
- Have students identify the purpose of each game they’ve just played- what is the objective of it? It should be explained in 1 sentence
- Students will analyze the following 2 games on MakeCode Arcade. Instructors should display the QR code on the board, never write links as students struggle with this:


- Give students 5 minutes to explore and play the MakeCode Arcade games. You can also ask students to give a thumbs up when they’re ready to move on to the next part of the activity.
- As students are playing the MakeCode Arcade games, prepare the following on the whiteboard. Create a box similar to this and when the class is ready start sharing their ideas, call up students to come up and help you jot down notes.
- Make it as interactive as possible!
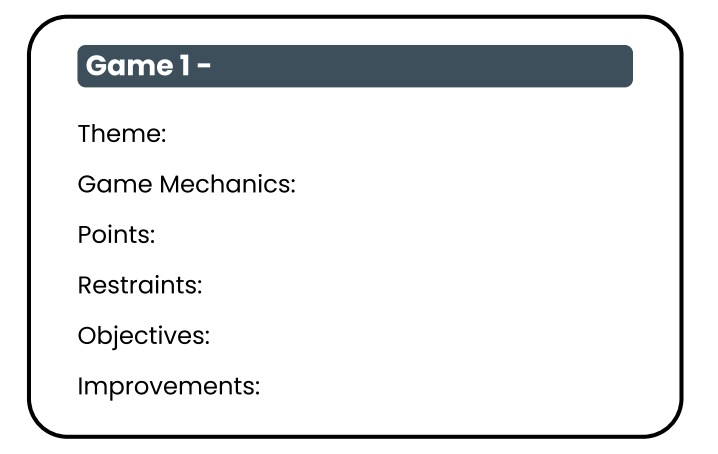
Here’s an example answer of a game analysis.
- Game 1, Maze Game
- Theme: In a forest, a girl completes a maze.
- Game Mechanics: There is a girl character, a map, and a treasure chest.
- Points: The end of the maze with a treasure chest.
- Restraints: A timer counting down and the forest walls blocking paths.
- Improvements: Less time to make it more challenging
Activity 2: MakeCode Arcade Introduction
Duration: 15 minutes
- This is the activity where students will open up MakeCode Arcade
- To open up MakeCode Arcade have students go to Google
- Then search the following: makecode arcade
- They will click on the link that says Microsoft MakeCode Arcade
- INSTRUCTORS SHOULD REVIEW THE BELOW AHEAD OF CLASS AND SHOW STUDENTS A LIVE DEMO DURING CLASS OF HOW TO:
- Set up a new project
- Open up previous projects
- The different blocks available in the workspace
- Game Screen
- MakeCode Arcade Introduction
- Ahead of class, all instructors should review this link and understand the different components of the MakeCode Arcade platform:
- When you open the Makecode Arcade environment
- New Project – creates a new project
- My Projects – past work that we have saved
- When you click on “New Project”
- Workspace – where you can place your blocks to create your program
- Toolbox – where you can get blocks
- Organized into several different categories such as Sprites, Scene and Controller
- Game Screen – simulator that shows what your game looks like and allows you to test out playing your game
- Instructors should complete Get to Know MakeCode Arcade Skill Map
- Before beginning the first code, there should be a few minutes worked in that reviews the toolbox specifically. I read each box aloud and had the students repeat it.
- For example, I said, everyone repeat after me, “Scene. Dark Blue Tree” or “Sprites. Blue Paper airplane”. After that, I would ask them what color is scene? They would answer with dark blue tree.
Activity 3: Creating a Story Hands-On Simulation
Duration: 15 minutes
- Let students know to follow along closely on their own devices as you work with them on a new simulation.
- Make sure they’re engaged and actually follow along rather than just sitting and watching!
- We are going to be creating our first story in MakeCode Arcade – A fish in an underwater scene. Our main character is trying to escape from a shark enemy. We will also add in music, set up the background, and have our main character say things.
- Instructors should try out all the simulation videos and steps ahead of time.
- Before students start their project, show students a demo of what they will create using the MakeCode Arcade file ahead of time. Play the simulation project and have students ask questions and get excited by what’s to come!
- Have them open up a new MakeCode Arcade file and name it ‘Under the Sea’
- PLEASE NOTE: rather than just giving them step by step instructions, have students get engaged! Call them up to the board, have them come up and drag blocks, insert questions, check for their understanding and take it slow!
- Make sure to pause and check for understanding and have students give you a thumbs up when ready to move on!
- First we want to set up the background.
- Find set background color to in Scene. Drag and drop it onto the on start. Click on the grey box and select the dark blue color.
- Next we need to create our main character sprite
- Find set mySprite to in Sprites. Drag it into the on start. Click on mySprite, select rename variable…, and change the name from mySprite to Fish. Open the image editor for Fish, and select the fish sprite from the gallery of preset images.
- Find move mySprite with buttons in Controller. Drag it onto the on start. Change the variable name from mySprite to Fish.
- This button allows us to move our sprite during the game using the arrow keys.
- Next we need to create our enemy sprite
- Find set mySprite to in Sprites. Drag it into the on start. Click on mySprite, select rename variable…, and change the name from mySprite to Shark. Open the image editor for Shark, and select the shark sprite from the gallery of preset images.
- Find set myEnemy follow mySprite in Sprites. Drag it onto the on start. Change myEnemy to Shark and mySprite to Fish. Click on the plus button to reveal the speed variable, and change the speed from 100 to 20.
- This will make our shark slowly follow our main character sprite.
- Next we want to make the Shark say something when it touches the fish.
- Find on sprite of kind Player overlaps othersprite of kind Player in Sprites. Drag and drop it onto the workspace. Change one of the Player variables to Enemy.
- Find mySprite say “:)” in Sprites. Drag and drop it inside on sprite of kind Player overlaps othersprite of kind Enemy. Change mySprite to Shark. Change the text to say “Chomp Chomp Chomp”. Click on the plus button and keep the time as 500 ms.
- We also want to add in a sound effect for when the shark catches the fish.
- Find play sound in Music. Drag and drop it inside on sprite of kind Player overlaps othersprite of kind Enemy. Select the knock sound effect.
- When adding music into games, confirm that the sound is on for all the iPads.
Activity 4: Checkpoint (You may or may not have time for this today!)
Duration: 15 minutes
- This is a perfect time for students to test their knowledge of sprites and creating a game with a narrative.
- Instructors should create the checkpoint MakeCode Arcade program ahead of class and show students the outcome of the checkpoint so they can ask questions and get excited to start creating!
- Student Task:
- Students will create a new file titled “My Story”
- Students will, create a game with a narrative/theme that they come up with on their own
- Theme examples:
- monkey in the forest
- underwater ocean theme
- outer space ship
- princess in castle
- Game must include:
- Creating a main character
- Creating an enemy
- Adding in music
- Setting a background
- Having our character say things…
- Moving our character around the scene
- Instructors can watch the video tutorial which demonstrates how to complete the checkpoint activity