Objective 1
Objectives for today’s class: Students will understand how to position their sprites on the screen.
Outline:
- Design Principle: Pixels and Positioning
- Hands on Simulation: Smiley & Food Party
- Learn how coordinates work by placing food on the screen.
- Coding Concept : Sequence, Logic
- Checkpoint Simulation:
Activity 1: Design Principle
Duration: 15 minutes
- Explain to students that the game screen is made of pixels. Pixels are small colored squares that make up an image on a computer screen.
- Think about the screen as your Canvas. It acts as a stage or field where the various characters in your game can interact with each other
- You can compare the game screen to a football field, and compare the pixels to football players.
- During a football game, the players can run and jump and shove each other around, but all of the action stays within the lines of the field’s boundaries.
- Your screen is a coordinate plane, which means it is a grid with points on it. Ask students if they’ve ever played Connect 4?
- The horizontal rows of pixels make up the x-axis (or the rows) and the vertical columns make up the y-axis (or the columns)
- For example, we will have students complete a hands-on movement to better understand x and y-axis
- Demonstrate to students and have them put their arms out for x and up and down for y.
- Play a little game where students have to put their arms out corresponding to whether you say x or y.
- Imagine a game of Connect 4. In the game, you are trying to line up 4 of your discs in a row before your opponent. There are rows and columns where you can place your discs. This is similar to how you can place pixels on a game screen.
- Let’s play a round of Connect 4 as a class. You can use this link to play the game as a class if there is time. Play no more than 3 rounds.
- Split the class into smaller groups and have each group decide where they want to play their red or yellow token during the game
- Now, let’s take a look at the grid (make sure to share your screen so the students can see the following grid). I would also recommend drawing a simple coordinate grid on the white board and having students label the different points on the grid as you call them out.
- Coordinates represent places on the screen where you can put a pixel. They are shown as two numbers in parentheses separated by a comma: for example, (4,3).
- When reading a coordinate on the game screen, start at the origin (the point farthest to the top left). The first number is your x-coordinate (the number of pixels you move to the right). The second number is your y-coordinate (the number of spaces you move down).
- Note how the first number in each axis starts at “0”, and not at “1”.

- Show the class a numbered coordinate plane, with the x-axis on the top of the grid and y-axis to the left. You can draw this on the board or project it onto a screen.
- First, name a coordinate – ex. (4,3). Ask students to volunteer to come up and find the place where the coordinate lies. Have them start at the origin, then trace along the x-axis with their finger, and then move down along the y-axis to find the spot. Try this a couple times.
- Now, show students an unnumbered coordinate plane. This is more similar to what the MakeCode Arcade screen will look like. Either show the MakeCode Arcade screen or draw an unnumbered coordinate plane on a whiteboard.
- Point to a random coordinate on the grid, and have students volunteer to come up to the board and name the coordinate.
- Repeat this a couple times until students are comfortable with this concept.

- The Makecode arcade is made of 160 pixels horizontally and 120 pixels vertically.
- Ask students the following questions:
- Where else have you seen the number of pixels listed? For example, Computer monitors, TVs, smart phones etc.
- What does it mean to have higher resolution or lower resolution? Which one is considered “better”?

Activity 2: Hands-on Simulation
- You will create two hands-on simulations during this section and create two separate MakeCode Arcade files. One called:
- Smiley
- Food Party
Instructors should create all the programs in the simulation ahead of time and show students an example of the outcome before starting with the simulation!
For this activity, share your screen and have students follow along as you guide them through each of the steps.
- Ask students, how do you select the position of your Sprite on the screen?
- Select the Sprites
command option

- Drag & drop sprite positioning block
to the On Start block
- Leave the default values of 0 for x and y, your program will look like this

Notice that the smiley face sprite is showing partially on the top left corner, as it is using the center of the sprite to position it on the screen.
- Now try moving the smiley face sprite a bit right and down so the full sprite is visible. Use the coordinate positioning by sliding left or right for x and y values

- Try placing the sprite in the center of the screen and observe the x and y values. Similarly, place the sprite at the
- Top right corner
- Bottom right corner
- Bottom left corner
Check In Activity
- Give students a few minutes to try the following check in activities and help students where needed.
- Have students place the smiley by clicking on the grid instead of sliding left and right on the x and y values. Ask them to move the smiley:
- Somewhere on the left side of the screen
- Touching the top right corner
- Have students place the smiley by manually typing in numbers for the x and y values. Remind students that the grid is 160×120. Ask them to move the smiley:
- Close to the bottom left corner
- Close to the middle of the screen (hint: 160 ÷ 2 = 80, and 120 ÷ 2 = 60)
- Call on a few students to come and showcase how they:
- Set the smiley to the left side of the screen
- To the top right corner
- To the bottom left corner
- To the middle of the screen
Smiley Simulation
- Instructors should try this activity ahead of time and show students the outcome.
- Have students create a new MakeCode Arcade file called Smiley
- Now as a class, ask students to create 4 different color smileys and place one in each corner of the screen. To help warm students up feel free to create the first 2 smiley sprites with the students and walk them through how to position the smileys.
- Ask students to make sure they do the following:
- Give each smiley a unique name
- Make sure each smiley is colored differently
- Make sure the smileys are placed at four different corners of the screen
- Call on a few students to share what they made with other students. You can even have a student come up to the board and try it up at the front of the class!
Food Party
- Instructors should try this activity ahead of time and show students the outcome.
- Have students create a new MakeCode Arcade file called Food Party
- The Food Party file will include:
- 1 smiley sprite as type player that moves with keyboard/buttons
- 4 food sprite as type food and place one each on the top left, top right, bottom left and bottom right corner
Make sure students pay attention to the type field when they’re creating their sprites! Help students by walking around the classroom.
Here’s how the program output will look.

The code output for the Food Party file is as follows:

Note: If the Sprites are not displaying as expected, click on the Run 
- Once students have finished creating their food party, ask students to share their answers to the following:
- From the program we just made, what happens when you move a smiley sprite over the food sprite?
- What would you like to see happen when you move the smiley sprite over the food sprite?
- For example, the food sprite being eaten
- For a program like this, how could you make it super fun and exciting by adding scoring? What would you set as the objective of the game?
- For example, record the score every time a smiley sprite moves over the food type sprite which indicates for example, that the smiley is eating the food sprite
We will get into and discover Sprite interactions later today!
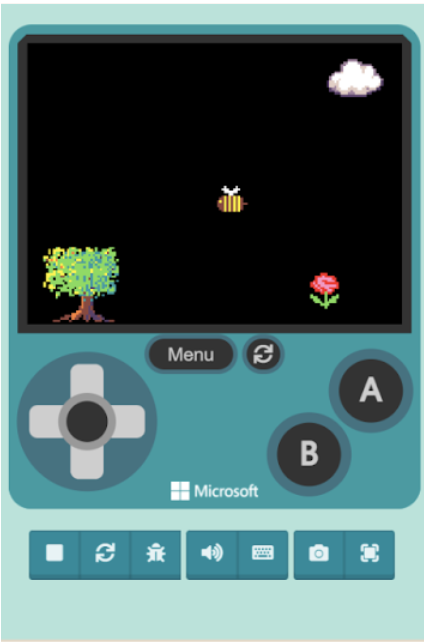
Activity 3: Spring Scene Checkpoint Activity
- Let’s combine all this knowledge we just learned into one final activity.
- Instructors should try this program ahead of class and create a file to showcase the program. Instructors should show students the outcome of the checkpoint to give them an idea of what to expect.
- We are going to create a program that displays a nature scene. As long as students include all of the required components, encourage them to get creative and let them add any additional enhancements
Checkpoint Activity:
- The program must include:
- A cloud sprite positioned at (140,15)
- A tree sprite positioned at the bottom left of the screen
- One or more flower sprites positioned at the bottom right of the screen
- A bee sprite that you design yourself, set to type “player”, that can move using the keys
You can show students the example below to give them inspiration.